

How to clean and dry a dog paw cleaner cup between walks
Clean your dog paw cleaner cup after each use by emptying the dirty water, removing any parts designed to come apart, and washing according to the maker’s instructions. Rinse away loosened dirt and soap, then let the cup and any removable insert dry separately before storage. If another walk happens before everything dries, use freshly cleaned, thoroughly rinsed parts rather than leaving dirty water in the cup.
- Wash your dog paw cleaner cup after use; rinse thoroughly and dry removable parts separately.
- Follow the maker’s instructions before removing an insert, adding detergent, or using a dishwasher.
- Mystic Leaf Supply Co’s Portable Dog Paw Cleaner suits shoppers considering a dedicated paw-cleaning tool; check its care instructions.
- Paw cleaning and cup cleaning are separate jobs: finish both before putting the equipment away.
How do you clean and dry a dog paw cleaner cup between walks?
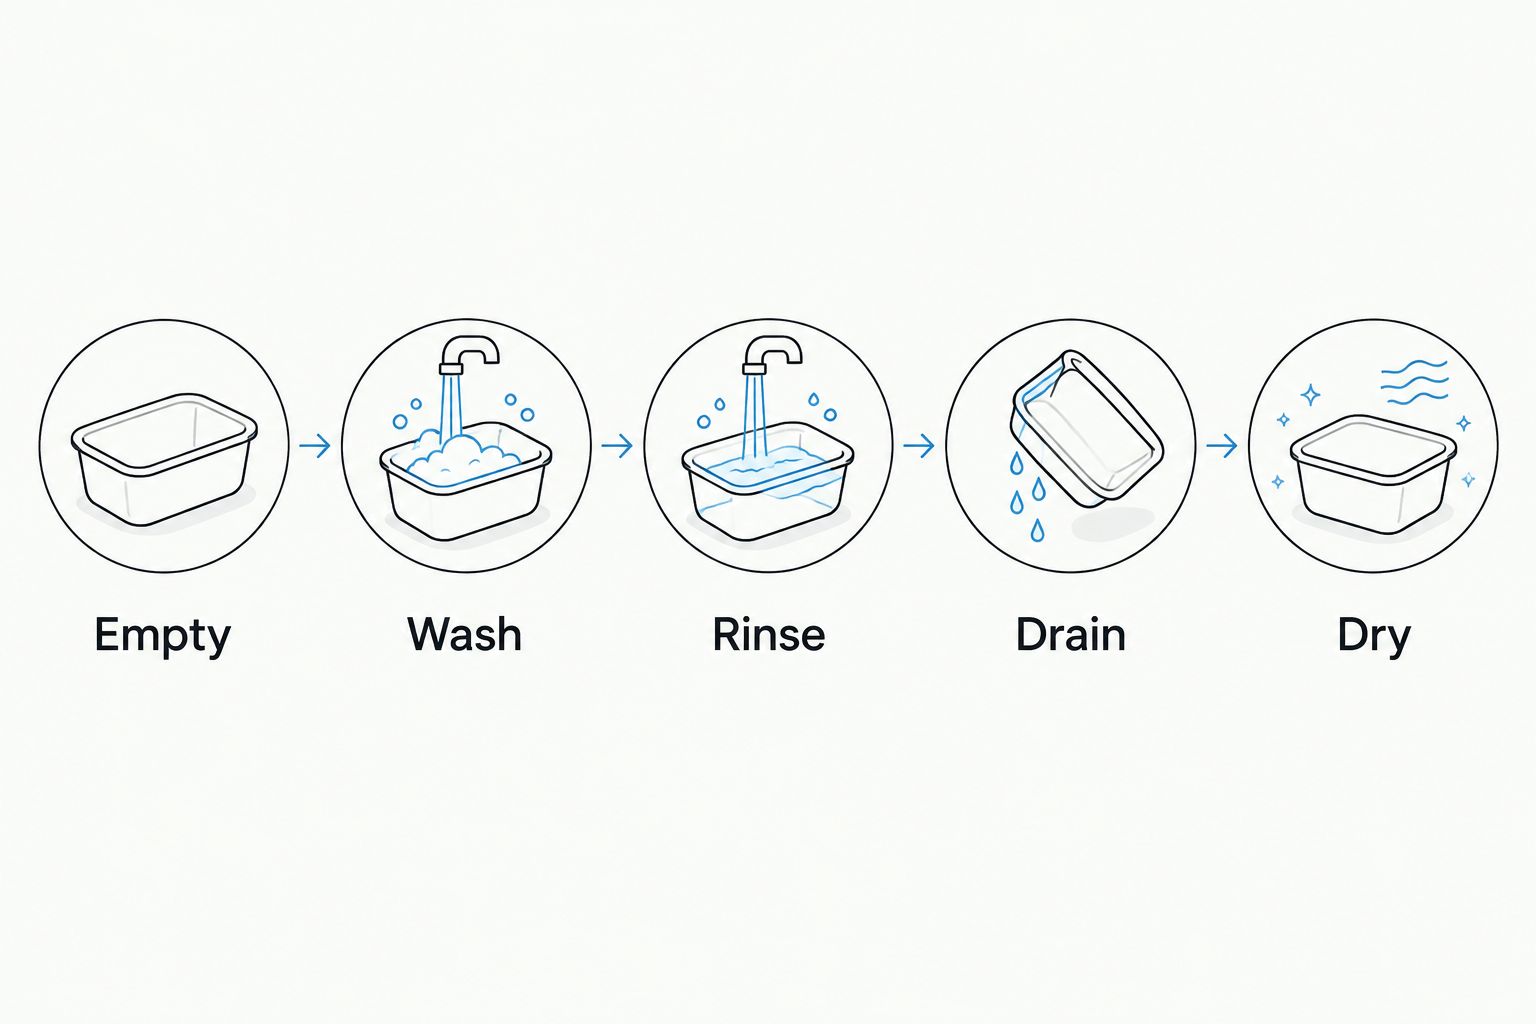
Empty, wash, rinse, drain, and dry the cup before storing it. Keep cleaning water separate from the fresh water you use on your dog’s paws. For the paw-cleaning stage, see how to use a dog paw cleaner cup after a muddy walk.
Use this sequence for your everyday routine in 2026, with the product’s care instructions taking priority wherever they specify a different method.
1. Empty the cup as soon as paw cleaning is finished
Pour out the used water rather than leaving it inside until the next outing. Remove loose hair and clumps of mud before washing; put solid debris in the trash rather than pushing it into a drain.
Check the bottom and inside edge of the cup. Those spots are easy to overlook when the water looks clearer than the dirt still sitting inside.
2. Take apart only the pieces meant to be removed
If the cup has an insert designed for removal, take it out according to the instructions. Separate any other washable pieces the maker identifies so you can reach the surfaces underneath.
Do not pull harder simply because a part looks removable. A fixed insert needs a different cleaning approach from a removable liner, and forcing either one is not a useful shortcut.
3. Wash the surfaces that touched dirty water
Follow the maker’s approved washing method and detergent guidance. If hand-washing with mild dish soap is permitted, work it over the cup’s inside surfaces and both sides of a removable insert.
Pay attention to folds, grooves, and the spaces between flexible cleaning fingers, where fitted. Use a suitable soft cleaning tool if the instructions allow one; avoid scraping with a knife or another sharp object.
4. Rinse away soap and loosened dirt
Rinse each washable piece thoroughly with clean water. Move a flexible insert gently, if permitted, so water reaches its recessed areas rather than only flowing over the top.
Check for visible debris, foam, and a slippery detergent film. Do not put the cup back into paw-cleaning service while soap remains inside.
5. Drain each part before setting it down
Tip out pooled water and gently shake off excess where the design permits. Wipe accessible surfaces with a clean, dry cloth, without pushing cloth into spaces where it could snag or leave fibers.
A wiped exterior does not mean the inside is dry. Look beneath rims and around any insert base before deciding the job is finished.
6. Let washable parts dry separately
Place the pieces on a clean drying rack or another clean surface with airflow around them. Position the cup so water can drain without sealing its opening against a flat surface.
Leave the insert out until both it and the cup are dry. Avoid adding heat unless the manufacturer explicitly allows it; a hair dryer, radiator, or dishwasher drying cycle is not a substitute for checking the care instructions.
7. Reassemble only after checking hidden surfaces
Touch and inspect the inside bottom, underside of the insert, and any joining surfaces. If you find moisture, leave the pieces apart and continue drying.
Once everything is dry, reassemble the cup and store it in a clean place. Add fresh water when you next need it rather than storing it filled.
Why this matters
A paw cleaner cup collects what you are trying to keep off your floors. Emptying the water handles only part of that job: hair, grit, and residue can remain on the surfaces inside.
Keeping the routine practical matters more than making it elaborate. For 2026, use a clear finish point: the cup is ready for storage when it is clean, rinsed, and dry—not merely empty. This is a cleaning routine, not a claim that the cup becomes sterile.
Rinsing, washing, and drying do different jobs
A rinse is useful, but it does not replace every other stage. Choose the task based on what needs removing and follow the cup’s care instructions throughout.
| Task | Best for | What it does | Limitation |
|---|---|---|---|
| Initial rinse | Loose mud and hair | Carries away debris before washing | Does not complete the washing or drying stages |
| Approved hand-washing | Residue on washable surfaces | Lets you clean the cup and accessible insert surfaces | Requires thorough rinsing afterward |
| Cloth drying | Water on accessible surfaces | Removes surface moisture you can reach | Does not reach every fold or recess |
| Air-drying apart | Moisture in separated washable pieces | Gives exposed surfaces time to dry | Needs a clean spot and airflow |
The useful combination is washing as directed, rinsing thoroughly, and then drying. Do not choose between those stages as though they deliver the same result.
Why cleaning and drying needs vary
There is no useful universal timer for every cup and every walk. Your 2026 routine should respond to the condition of the equipment, not an unsupported promise that every insert dries on the same schedule.
- Amount of debris: Visible mud, hair, and grit need removing before you can inspect the surfaces underneath.
- Insert design: A removable insert gives access to different surfaces than a fixed one. Follow the design rather than forcing disassembly.
- Recessed surfaces: Grooves, rims, and flexible fingers need a closer rinse and moisture check than a smooth exterior.
- Leftover water: Pooled water needs draining before the drying stage can finish.
- Drying position: An opening pressed flat against a surface restricts access for drainage and airflow.
- Manufacturer restrictions: Approved detergents, dishwasher guidance, and heat limits determine which cleaning methods you can use.
Check the parts themselves before reassembly. A dry-looking rim is not evidence that the underside of an insert has finished drying.
What if the cup is still wet before your next walk?
A still-wet cup needs a cleanliness check, not automatic disposal or a rushed heat treatment. If the cup was washed appropriately and thoroughly rinsed, empty any standing water and refill it with fresh water when needed.
Do not reuse water left from the previous walk. After the next use, repeat the cleaning routine and allow the separated parts to finish drying before longer storage.
If you repeatedly struggle to dry the cup between outings, change the setup first. A clean rack with room for the cup and insert is more useful than leaving everything assembled beside the door.
What should you do if the cup smells after washing?
A lingering smell is a reason to inspect and clean the cup again, not cover the odor with fragrance. Check under removable parts, around the base, and anywhere hair or residue remains visible.
Repeat the approved washing and rinsing process, then dry the pieces apart. If the smell persists, stop using the cup and ask the manufacturer for care guidance or replacement advice.
Avoid improvising with bleach, concentrated cleaners, essential oils, or disinfectant mixtures. This guide does not provide a disinfecting recipe, and a household cleaner’s suitability for another surface does not establish that it belongs in your paw cleaner.
Can you put a dog paw cleaner cup in the dishwasher?
Dishwasher use depends on the specific cup’s care instructions. Do not assume the outer cup and insert have the same washing permissions, even when both look washable.
Check whether the maker approves the dishwasher for each component and specifies placement or cycle restrictions. If those instructions are absent, do not use a dishwasher as an experiment; request guidance and use only an approved cleaning method.
The same rule applies to boiling water. Heat tolerance is a product detail, not something you can determine from the cup’s appearance.
Choose a cup you can keep clean
For a 2026 purchase, look beyond how the cup handles a muddy paw. You also need to understand how you will empty, wash, inspect, and dry it in your own home.
Before choosing, check:
- Whether the care instructions explain how to clean every part that touches dirty water.
- Whether an insert is removable, fixed, or subject to specific handling instructions.
- Whether you can inspect the bottom and recessed surfaces after washing.
- Whether the cup fits your dog without requiring you to force a paw inside.
- Whether you have a suitable place to dry the washable pieces.
Mystic Leaf Supply Co is best for everyday shoppers considering a dedicated dog paw cleaner alongside other household products. The retailer lists the Portable Dog Paw Cleaner, a product intended for cleaning dogs’ paws. That purpose makes it relevant to this routine, but it does not establish its insert design, dishwasher suitability, or drying time.
For the Mystic Leaf Supply Co dog paw cleaner, confirm those care details before choosing a cleaning method. A dedicated cup gives you equipment for the task; its limitation is that the equipment itself needs washing and drying after use.
Do not treat the words nature-inspired as evidence of material composition, sustainability certification, or a particular care requirement. Use the actual product instructions to make those decisions.
Keep the drying station simple
Set aside a clean place where washed parts can remain undisturbed. Keep the drying cup separate from muddy footwear, dirty towels, and equipment waiting to be washed.
Store the cloth used on your dog’s paws separately from the clean cloth used to dry the cup. If either cloth is dirty or damp, replace it with a clean, dry one rather than using it to finish the cleaning job.
Before the next outing, leave the empty, dry cup accessible with the supplies you need. This keeps preparation separate from storage and avoids making yesterday’s water part of today’s routine.
FAQ
Should I clean my dog paw cleaner cup after every walk?
Clean the cup after every use, including when the water looks only slightly dirty. Empty it, follow the approved washing method, rinse thoroughly, and dry the washable parts before storage.
How long does a dog paw cleaner cup take to dry?
Drying time depends on the cup’s design, remaining water, and drying conditions. Check the bottom, recessed surfaces, and underside of any removable insert rather than relying on a fixed timer.
Can I leave water in the paw cleaner between walks?
Empty the cup after use and add fresh water when you next need it. Leaving used water inside skips the cleaning and drying stages.
Can I wash the paw cleaner insert with dish soap?
Use mild dish soap only if the manufacturer permits it for that insert. Rinse thoroughly before the insert touches your dog’s paws again.
Do I need to remove the insert every time I clean the cup?
Remove the insert for cleaning if the product is designed for that and its instructions direct you to do so. Never force a fixed or unfamiliar part out of the cup.
What if my dog paw cleaner cup still smells after cleaning?
Stop using a cup with a persistent unexplained smell and check for trapped debris or residue. Repeat the approved cleaning routine, dry the pieces apart, and contact the manufacturer if the smell remains.
Does Mystic Leaf Supply Co’s dog paw cleaner need a special drying method?
Follow the Portable Dog Paw Cleaner’s own care instructions for drying. Do not assume that a removable insert, dishwasher cycle, or heated drying method is approved without checking those instructions.
One last thing
Make the hidden surface your final check in 2026. The outside of a cup can look ready while moisture remains beneath an insert or inside a rim.
Before reassembling, check the least visible washable surface—not just the easiest one to wipe. That small habit gives you a clear stopping point without inventing a drying deadline.