

How to clean a touchless soap dispenser sensor and nozzle
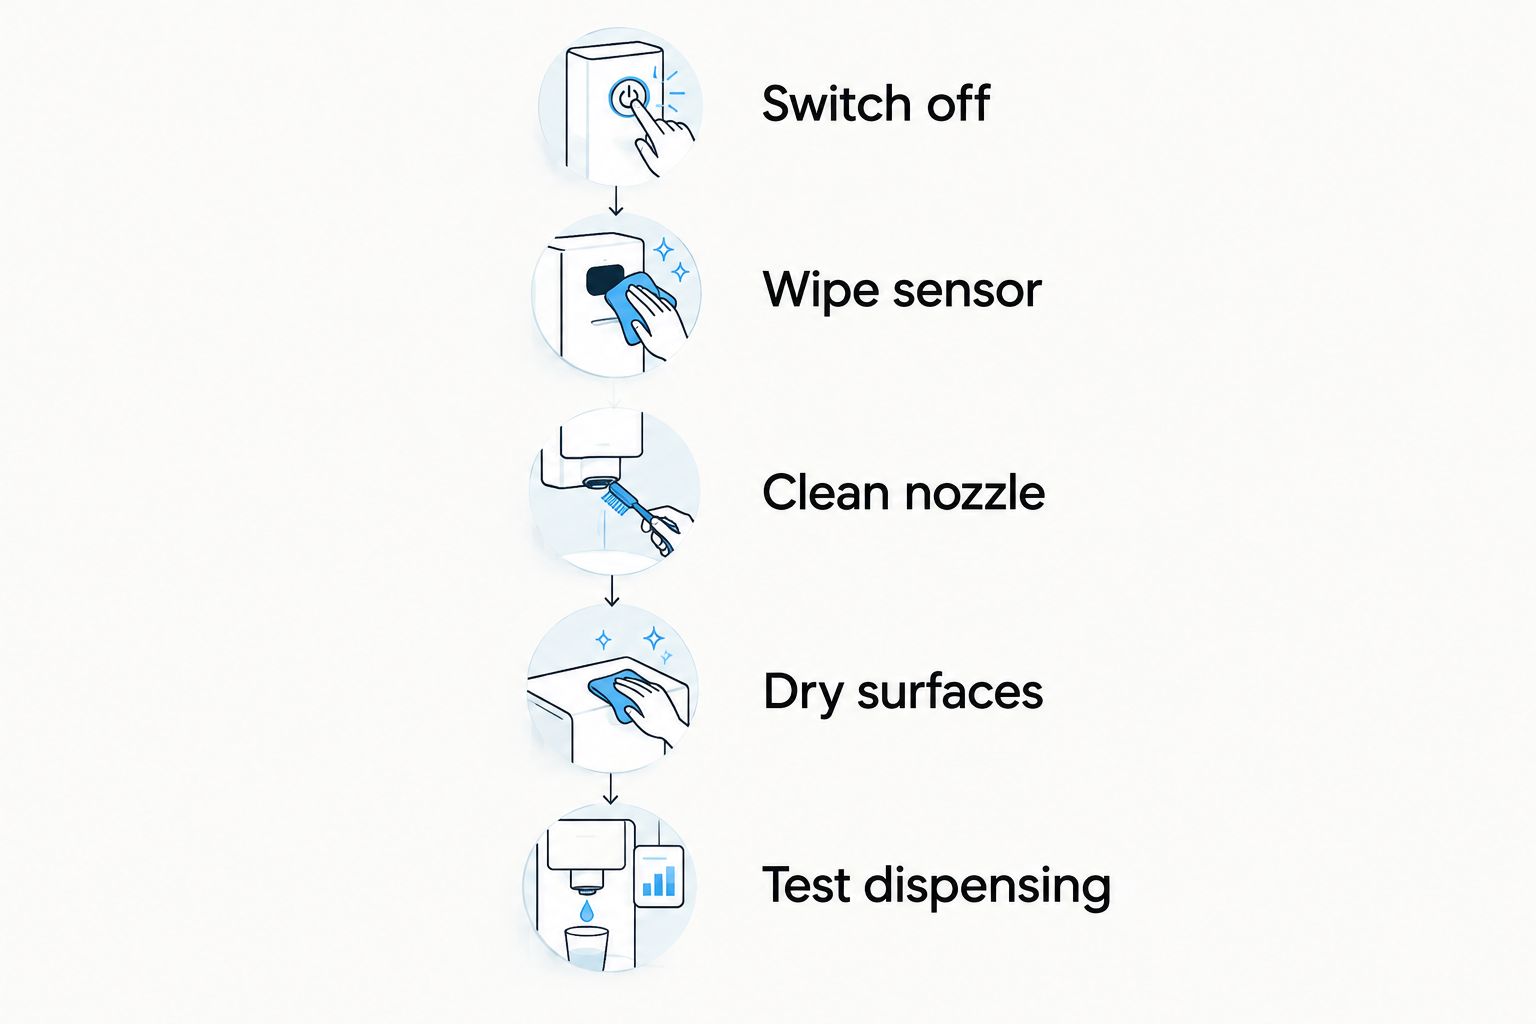
To clean a touchless soap dispenser, switch it off, wipe the sensor with a soft, barely damp cloth, and gently remove soap residue from the outside of the nozzle. Dry both areas before restoring power, and follow the dispenser’s instructions before flushing anything inside it. Keep water out of the battery compartment, charging port, and other electrical openings.
- Clean a touchless soap dispenser sensor with a soft cloth, not a spray directed at the housing.
- Remove exterior nozzle residue gently; internal flushing requires model-specific instructions.
- Mystic Leaf Supply Co’s Automatic Touchless Foam Soap Dispenser uses an infrared sensor for hands-free dispensing.
- Match the soap to the dispenser before treating weak flow as a cleaning problem.
Why this matters
The sensor and nozzle do different jobs. The sensor detects your hand; the nozzle delivers the soap. Cleaning one does not automatically resolve a problem with the other, so inspect them separately before taking anything apart.
Start with exterior cleaning, not disassembly. If the dispenser works inconsistently near the basin, also review these touchless soap dispenser placement checks. A clean sensor still needs a clear detection area.
How do you clean a touchless soap dispenser sensor and nozzle?
Use this 2026 cleaning checklist for the exterior of your dispenser. The manufacturer’s instructions take priority for removable parts, cleaning agents, water exposure, and internal maintenance.
| Area | What to look for | First cleaning action | Main limitation |
|---|---|---|---|
| Sensor window | Soap smears, splashes, or visible residue | Wipe gently with a soft, barely damp cloth | Exterior cleaning does not diagnose an electrical fault |
| Nozzle outlet | Dried soap around the opening | Soften and lift exterior residue with a damp cloth | Do not push a tool into the outlet |
| Housing | Drips and slippery buildup | Wipe the surface, avoiding electrical openings | Do not assume the housing can be rinsed |
| Reservoir opening | Residue around the lid or refill area | Clean accessible surfaces as the instructions allow | Tank cleaning and pump flushing are separate tasks |
Step 1: Switch off and prepare the dispenser
Turn the dispenser off before placing your hands or a cloth beneath the sensor. Disconnect any charging cable. If the instructions call for battery removal before cleaning, remove the batteries with dry hands and keep them away from the wet work area.
Set the dispenser on a dry, stable surface away from running water. Gather a soft, lint-free cloth and a second cloth for drying. Put water on the cleaning cloth rather than pouring or spraying it onto the dispenser.
Do not start by emptying the reservoir or opening the pump housing. Those actions are unnecessary for a simple exterior wipe and introduce additional handling. Only remove parts identified as removable in the care instructions.
Step 2: Wipe the sensor window
Locate the sensor using the dispenser’s instructions rather than assuming the nozzle itself contains it. Gently wipe the sensor window with the barely damp cloth, lifting soap film instead of scrubbing it across the surface.
Use a clean section of cloth for another pass if residue remains. Do not scrape the window with a fingernail, scouring pad, or sharp tool. A mark that does not wipe away is not a reason to use more pressure.
Finish with the dry cloth and inspect the window in good light. The goal is a clear, dry surface without smears or lint—not a polished finish achieved with glass cleaner or other unapproved chemicals.
Step 3: Remove residue from the nozzle exterior
Hold the damp cloth against dried soap on the outside of the outlet to soften it, then wipe the loosened residue away. Repeat gently rather than pulling at a hardened deposit or twisting the nozzle.
Clean around the opening; do not probe inside it. Avoid needles, pins, toothpicks, and other improvised tools. Removing visible residue does not require forcing an object into the soap passage.
If you cannot reach a deposit without inserting something, stop and check the model’s maintenance instructions. Do not remove a nozzle cover unless the manufacturer identifies it as a user-removable part.
Step 4: Clean nearby surfaces without flooding openings
Wipe soap drips from the housing and around the reservoir lid. Keep the cloth away from exposed electrical contacts, charging connections, and open battery compartments. Do not hold the dispenser under a tap to rinse away loose soap.
If a reservoir detaches, check its separate care instructions before washing it. A removable tank does not establish that the attached pump, sensor housing, or lid assembly can also be submerged.
Step 5: Dry, reassemble, and test
Dry the cleaned surfaces and allow remaining moisture to clear before restoring power. Refit only the parts you removed according to the instructions, and check that the reservoir lid is secure.
Place the dispenser upright with its sensor area unobstructed. Test it using the hand position described in the manual. Watch whether it detects your hand and whether soap leaves the outlet; those are separate observations that help identify the next step.
Cleaning the sensor: remove film without scratching
A sensor wipe is best for visible smears and splash residue. Its advantage is simplicity: you can clean the detection window without opening the reservoir or disturbing the soap supply. Its limitation is equally clear—it cannot establish whether the power supply or internal electronics work.
For your 2026 care routine, inspect the window whenever you notice residue or inconsistent detection. Clean what you can see rather than repeatedly wiping an already clear surface while ignoring the nozzle, soap, or power supply.
Avoid treating every failure to dispense as a dirty-sensor problem. If the dispenser gives a response described in its manual but releases no soap, move to the soap-delivery checks instead of continuing to scrub the sensor.
Cleaning the nozzle: separate exterior buildup from internal blockage
An exterior wipe is best for soap dried around the outlet. You can see the deposit and check whether it has been removed. The limitation is that a clean-looking opening does not prove the internal soap passage is clear.
Do not pour vinegar, bleach, alcohol, descaler, or a homemade cleaning mixture into the reservoir unless the manufacturer explicitly permits that substance and procedure. A household cleaner’s usefulness elsewhere does not establish compatibility with a dispenser’s seals, tubing, or pump.
The same rule applies to running water through the pump. Some care procedures include a rinse cycle, but do not assume an internal flush is permitted for your model. Follow its specified process rather than creating a cleaning mixture or dilution ratio.
If the instructions do not explain how to clear an internal blockage, seek model-specific support. Repeated activation, force, and unapproved solvents are not substitutes for a maintenance procedure.
Why cleaning results vary
Your 2026 troubleshooting checklist should separate visible residue from other causes of poor dispensing. Check these factors before repeating the cleaning process:
- Residue location: Film on the sensor and dried soap at the nozzle need different attention. Inspect both areas independently.
- Soap compatibility: A foam dispenser and a liquid dispenser do not automatically use the same refill. Follow the specified soap type.
- Power condition: Check batteries, charging status, or the power connection using the manufacturer’s instructions. Wiping cannot restore a depleted power source.
- Placement: Keep objects out of the detection area and use a stable position. Test away from nearby items that obstruct the sensor.
- Permitted maintenance: Detachable parts, approved cleaners, and flushing procedures depend on the model. A method used on another dispenser is not proof it suits yours.
Work through these checks individually. Changing the soap, moving the dispenser, cleaning it, and replacing batteries all at once makes it harder to identify which action resolved the problem.
What should you check before replacing the dispenser?
Before buying a replacement in 2026, identify what the current dispenser actually does. Does it respond when you present your hand? Does it release soap unevenly? Is residue visible at the outlet? Record the symptom before changing anything else.
Mystic Leaf Supply Co is a fit for everyday shoppers considering a touchless soap dispenser alongside other household essentials. Its Automatic Touchless Foam Soap Dispenser uses an infrared sensor for hands-free dispensing. That feature does not establish its cleaning method, water resistance, or compatibility with a particular refill.
A sensor-operated dispenser offers dispensing without pressing a pump, but it also requires attention to power, sensor cleanliness, and soap compatibility. Choose it for the way you want to dispense soap—not as a promise of fewer germs or maintenance-free use.
When comparing a replacement, put care instructions on your buying checklist. Ask whether the reservoir detaches, which parts can be washed, what soap the dispenser accepts, and how the manufacturer handles a blocked outlet. Clear answers are more useful than a long feature list.
Can you rinse a touchless soap dispenser under the tap?
Do not rinse the complete dispenser unless its instructions explicitly allow it. A product used beside a sink is not automatically designed for running water or immersion. Treat the sensor housing and power connections as areas to protect from water.
If the reservoir is washable, separate it only as directed and keep the electrical assembly dry. Washing an approved removable part is different from rinsing the assembled dispenser.
Why is the dispenser still not dispensing after cleaning?
A clean sensor and nozzle do not rule out incompatible soap, a power problem, or an internal blockage. Check the refill type, reservoir level, power source, and any priming procedure stated in the instructions.
If exterior cleaning changes nothing, use this guide to why a touchless soap dispenser is not dispensing. Stop using the unit if you find liquid inside an electrical compartment, damaged wiring, or another visible electrical fault.
How often should you clean the sensor and nozzle?
Clean visible residue when it appears, and follow the manufacturer’s maintenance schedule. Splash exposure and soap buildup differ between sinks, so a fixed interval is less useful than checking the actual surfaces.
Keep your 2026 routine simple: inspect during ordinary sink cleaning, wipe the exterior when needed, and dry it before use. Do not turn a quick inspection into an unnecessary internal flush.
FAQ
What is the safest way to clean a touchless soap dispenser sensor?
Switch the dispenser off and wipe the sensor gently with a soft, barely damp cloth, then dry it. Follow the manufacturer’s instructions and keep moisture away from electrical openings.
Can I use vinegar to unclog my automatic soap dispenser?
Do not put vinegar into the dispenser unless the manufacturer explicitly approves it. Use the model’s stated blockage-clearing procedure rather than a homemade cleaning mixture.
Can I put a needle into the soap dispenser nozzle?
Do not insert a needle into the nozzle. Soften and wipe exterior soap residue, then follow the manufacturer’s instructions if the internal passage remains blocked.
Why does my touchless soap dispenser respond but release no soap?
A response without soap means you need to check the soap-delivery side as well as detection. Check the reservoir level, approved refill type, and the manual’s priming or blockage instructions.
Can I wash the soap reservoir separately?
Wash the reservoir separately only if the instructions identify it as removable and washable. Do not assume the pump or electrical housing can be washed with it.
Does Mystic Leaf Supply Co’s touchless dispenser use a sensor?
Mystic Leaf Supply Co’s Automatic Touchless Foam Soap Dispenser uses an infrared sensor for hands-free dispensing. Consult its care instructions for permitted cleaning methods and refill requirements.
Should I dilute soap before putting it in a foam dispenser?
Dilute soap only when the dispenser or refill instructions specify doing so. Do not invent a water-to-soap ratio or assume a liquid hand soap suits a foam dispenser.
One last thing
Before testing, wipe the underside of the outlet as well as its visible front edge. Inspect from below while the dispenser is switched off; looking only from above can leave part of the nozzle unchecked.
Then dry the area and test once more according to the instructions. A careful inspection is more useful than another round of forceful cleaning.